
Sod
Sofa Sculpture
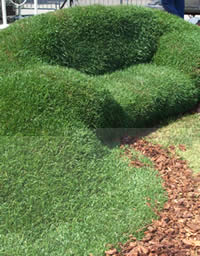
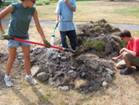
Sod sofa and photo by Greg Tate, greg.tate@hotmail.com.
Sod sofa and photo by Greg Tate, greg.tate@hotmail.com.
![]() Printable
PDF version
Printable
PDF version
Related videos:
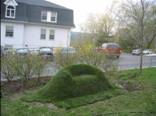
In turf works, we create living sculpture by shaping
soil and covering it with grass or moss. These sculptures
take on many shapes and sizes, from sod animals and
other figures, to more abstract creations. One of
the most popular forms is a very literal translation
of the term “lawn furniture.” Sod sofas,
chairs, and chaise lounges are all the rage in both
public and private settings. In addition, they’re
as functional as they are fun. They have a lot of
appeal since they can provide a place to hang out
and congregate in a public space such as a school
garden, community green space or public garden.
No
matter what shape the sod seating takes, the basics
of construction are the same. These instructions focus
on a traditional sofa shape. However, using the same
steps you can easily create armchairs, chaise lounges,
or whatever type of furniture meets your needs and
creative aspirations.
A
critical factor before going further is to find out
whether sod -- rolls of grass that have been harvested
and rolled for quick application -- is available in
your area. Although direct seeding is an option, it
takes much longer to germinate and produces more varied
results.
Design
The sky’s the limit when it comes to design
and there is plenty of inspiration in the home and
lawn furniture that we encounter every day. One thing
to be careful of is sharp edges or angles that may
shade areas of your creation from sunlight. If an
angle is too tight and deprived of adequate light,
the sod there may yellow or brown, distracting from
your finished product.
Another
design consideration is to carefully examine the space
at hand. Is it a broad green expanse of lawn, or a
nook and cranny into which a piece of furniture can
be “tucked?” Give careful thought to how
the furniture will be used, by whom, how often, and
in what manner to inform size, location, and scale
with respect to is surroundings.
Site Selection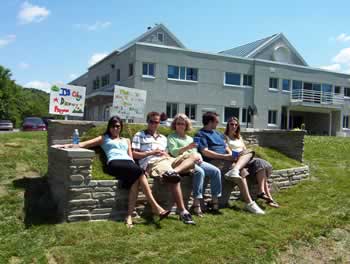
Almost any site with adequate drainage and sun exposure
will work. Consider a south facing exposure to maximize
daily sunlight. Also important is access to water,
as the first few weeks of your sofa’s existence
will require at least daily watering.
Materials
- Soil
- Sod
- Shovels
- Water
- Ground staples
- A large, knife for cutting sod
- Hammer or mallet
Some
notes on materials:
Soil quantity:
The biggest question when it comes to soil is: how
much do we need?
If you have a very detailed design, carefully drawn
to scale, you can measure all the dimensions to calculate
the cubic feet of soil needed.
If
you’re approaching your project in a more free-form
manner
considering measuring the dimensions of a similar
size piece of furniture to calculate an estimate of
cubic feet. In either case it’s advisable to
place your order for 150% of what your measurements
suggest. This will allow for any misjudgments in calculations
and the average 25% compaction rate.
Soil quality:
Because your soil is most likely supporting grass,
you needn’t worry much about the nutrient levels
or pH; although the pH should be in the 6-6.5 range,
it can easily be adjusted with lime. In addition,
nutrients can be added in the future, since grass
readily accesses nutrients. The most important consideration
is how easily the soil can be molded into the desired
shape. Very sandy or rocky soils can pose problems
as they are less likely to hold their shape well.
A very heavy clay soil may be difficult and heavy
to move around and work with.
Sod:
You can expect to pay about $.40/square foot of sod
from a sod farm. Typically sod is sold in 10 sq. foot
rolls. Many sod farms deliver but you may save a bit
if you are willing to pick it up yourself.
The best scenario would be to pick up the sod the
day you plan to use it. However, sometimes that just
isn’t practical. If you have to store sod for
a day or two before applying it be sure to roll it
out flat in a shady spot and keep it well watered.
Sod quantity:
Just like soil, you’ll
need to estimate based on measurements. Again, it’s
advisable to purchase 25-35% more sod than you think
you’ll need. Here are three examples of sod
furniture and the amount of sod needed for each.
 |
 |
 |
||
| 100
sq feet |
170
sq feet |
270
sq feet |
||
Knife:
In some spots you’ll have to custom cut your
sod to make it fit properly. Special sod knives do
exist but an average, serrated bread knife works just
as well, if not better.
Ground staples:
You’re best bet is 6” ground staples.
You’ll use these to anchor your sod to your
soil. Most garden and hardware stores carry them at
around $15 for a package of 75.
Construction
 |
 |
 |
 |
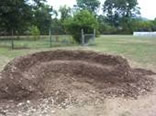
Soil Shaping:
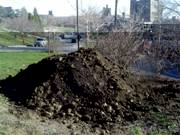 consuming and hard work. The closer your soil is,
the quicker you can get to the shaping.
consuming and hard work. The closer your soil is,
the quicker you can get to the shaping.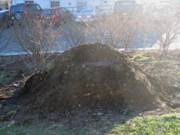 details and creative touches in your design. Have
water handy as it often helps to dampen soil for fine,
detailed molding.
details and creative touches in your design. Have
water handy as it often helps to dampen soil for fine,
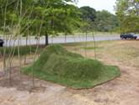
detailed molding.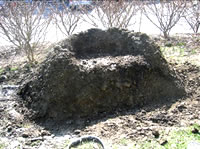 Planning
for sod placement is time well spent. This will help
you use your sod more efficiently and minimize the
number of custom cuts that are needed. Try to use
full rolls if possible.
Planning
for sod placement is time well spent. This will help
you use your sod more efficiently and minimize the
number of custom cuts that are needed. Try to use
full rolls if possible.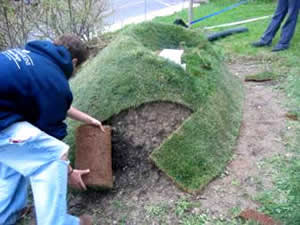 Or,
hold up the pieces, and press together as you lay
them down so that the edges are very firmly placed
together.
Or,
hold up the pieces, and press together as you lay
them down so that the edges are very firmly placed
together.