| Living
Dome
 Printable
PDF version Printable
PDF version
Domes, tunnels, arches, and fencing are all popular
methods of employing tree sculpture in a garden or landscape.
In addition to being beautiful and/or whimsical, they
may also serve a purpose such as providing shade or
defining a barrier.
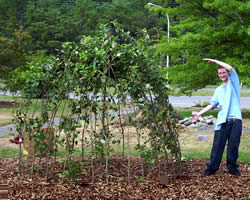
A
repeatable and inexpensive example of tree sculpture
is a dome of apple trees that was constructed to provide
a “hidden” play space for children at a
public children’s garden. Although this utilizes
apple as the plant material, one could easily replace
willow cuttings or hornbeam or ash saplings just as
successfully.
Materials
- Saplings
For this sample project we used apple M-7 rootstocks
– the rootstocks themselves, not an apple variety
you might generally think of planting, such as McIntosh
or Empire. Rootstocks won’t provide apples like
a typical apple tree but may eventually produce crabapple
type fruit. These saplings were available free of
charge, which was the main reason apple was chosen.
What material may be readily available or free to
your program?
Aside from convenience, the M-7’s also possess
some desirable
characteristics that matched the needs of our project:
- M-7
is a semi-dwarf rootstock and we wanted height
to manageable.
- Because
of its genetic selection, the M-7 is very pliable
which we needed for shaping the dome.
- M-7
is resistant to fire blight, a common problem
on apple trees.
- Shovels
- Water
access
-
Mulch
Design
Domes, just like tunnels or arches, have a basic
shape. If you’ve decided on a dome, you’re
probably looking at a circular footprint. It’s important
to ask how big you want the interior of the dome to be
and then assessing how big the structure will need to
be to accommodate your vision. You may want to take the
design process a bit further and think about elements
such as entering and exiting the dome and if you’d
like to include windows or portals that let you see out
or in.
Site Selection
Once you’ve decided on a dome as your project, the
next step is finding the right site for your structure.
Some considerations:
- How
will the dome fit in with the other gardens or elements
nearby?
- Is
there adequate space for the dome as well as the extra
space needed to construct it?
- Does
the site get adequate sunlight?
- Does
the site have adequate drainage?
- Where
is the nearest water source?
After
you have assessed your site and determined the final
location, it might be helpful to revisit your design.
Does your design need to be bigger or smaller to fill
the selected space.
Creating
the Dome - Site Preparation 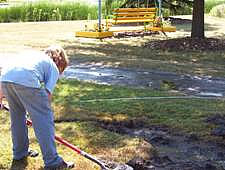
- Cleat
sod from one and a half times the planting area.
- Turn
the soil to loosen and then level out.
- Sometimes
the removal of sod leaves a depression. If this happens,
spread extra soil over your area to raise the level
back to its original height.
Creating
the Dome - Infrastructure
For the example show, we used:
- 7
thin wooden posts, approximately 8 feet tall
- Black
well piping ½” diameter
- Joining
places for pipe
- Power
screwdriver and screws
-
Twine
- Mark
out the diameter of your dome and determine the center.
- Secure
one of the wooden posts in the center of the dome
outline. The saplings will be secured to the top of
this post temporarily to help shape the dome.
- Just
inside the diameter you marked, secure four posts
in a square pattern.
- An
“X” was made 5-6’ up by screwing
crossbeams into the posts.
- Two
rings were made or rubber tubing, on two feet less
in diameter than the other. The wider one was affixed
to the 4 posts at 5.5 feet. It was fit into notches
cut into the posts and then tied with twine. The second
ring was tied to the crossbeams on foot above the
first ring.
Construction
the Dome - Planting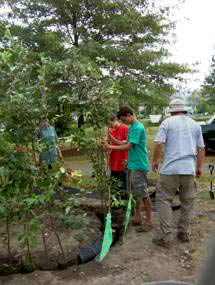
- Gather
all the plant materials (it’s best to keep them
in the shade until you’re ready to plant).
- Lay
all the plant material out before planting. By laying
all the plants out in the location they will be when
planted you can make adjustments prior to planting
to ensure saplings are evenly spaced around the dome.
- Some
people prefer to dig individual holes for each of
the saplings. Others prefer to dig a circular trench.
Either way will work.
- When
placing the saplings in the holes or trench, pay attention
to their natural shape and tendency. The trees in
this project were planted so that their side branches
would point outward. These were used later on to weave
and graft giving the “walls” of the dome
its fullness.
- Any
large branches pointing inward were pruned to ensure
an open interior.
 The
natural tendency of the trees is to lean toward the
middle of the dome. Because of this, the tops of the
saplings were pushed to the outside of the lower ring
and pulled to the inside of the upper ring. This helps
provide the dome shape to the roof. The
natural tendency of the trees is to lean toward the
middle of the dome. Because of this, the tops of the
saplings were pushed to the outside of the lower ring
and pulled to the inside of the upper ring. This helps
provide the dome shape to the roof.- Any
saplings that deviated significantly from the ring
guides were tied with loops of twine to train them
without girdling.
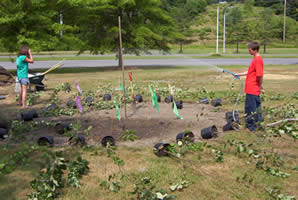
- Once
all the trees are planted, water well.
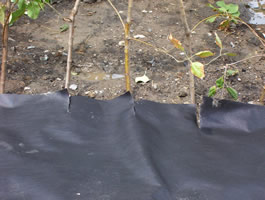
-
It’s important to suppress grass and weed growth
around the newly planted dome. In this project, landscape
fabric was carefully cut to fit around the newly planted
trees and secured with 6-inch ground staples. This
was covered with a thick layer of mulch. If your resources
are slim, an extra thick layer of mulch or wood chips
would easily do the trick.
 Constructing the Dome - Weaving
In
order to create a living wall effect on the sides of
the dome, the branches were woven laterally through
neighboring tree shoots. A very loose effect is desired
at this stage, taking care not to break the branches
is more important than achieving a tight weave. Some
flexibility must remain if the piece will be able to
move with the wind. Simply training the trees to grow
through each others is the objective.
Printable
PDF version
|